Help Center
Documentation
1. Introduction
DeepL for Salesforce is your translator directly in your Salesforce system and uses state-of-the-art AI technology to ensure better and time-optimised communication in all areas of your company. The following documentation provides you with detailed information about the tool and describes all the necessary installation and configuration steps for the successful use of DeepL for Salesforce. Do you have any questions or need help setting up the tool? Simply send us an email to support@deepl-for-salesforce.com and we will help you immediately.
1.1. Features
DeepL for Salesforce offers you the following functionalities directly in your own Salesforce environment:
Automated translation of texts from all areas of the company.
Avoidance of manual correction loops through glossaries.
Definition of "untranslatable" terms such as brand names or proper names.
All functionalities can be fully automated (depending on preference). DeepL for Salesforce and Salesforce-native automation options interlock seamlessly.
This list provides an overview. These functions are described individually and in detail below.
1.2. Interface of DeepL for Salesforce
The interface for configuring and using DeepL for Salesforce is made up exclusively of native Salesforce components. You will find the following tabs in the application:
| Tab | Description |
|---|---|
| Home | On the start page you will find current dashboards of the monthly translations of the templates. |
| Configurations | You control the basic settings and rules of the application with the help of a "Configuration" data record created during configuration. |
| Settings | Here you create and manage the basic translation settings for DeepL. |
| Templates | Here you create and manage your templates, in which you specify which field is to be translated into which field and in which language. |
| Glossaries | Here you create and manage your glossaries. |
| Results | List of most of the actions performed in the application with the respective result and information about any errors that may have occurred. |
This overview is intended to make the following documentation easier to understand. Details on the use of the individual tabs will be provided later.
1.3. Requirements
DeepL for Salesforce initially requires the use of a Salesforce Platform Edition or Salesforce Sales Cloud Enterprise Edition. Higher editions of SalesCloud are of course also supported.
You will also need a DeepL API key, which you can find in your DeepL account.
2. Installation and Setup
A few preparatory steps are necessary to use DeepL for Salesforce. These naturally include the installation of the tool itself, but also further configuration measures, which we describe in this section.
2.1. Installation
DeepL for Salesforce is installed via the Salesforce AppExchange.
Click on the "Get It Now" button to start the installation process.
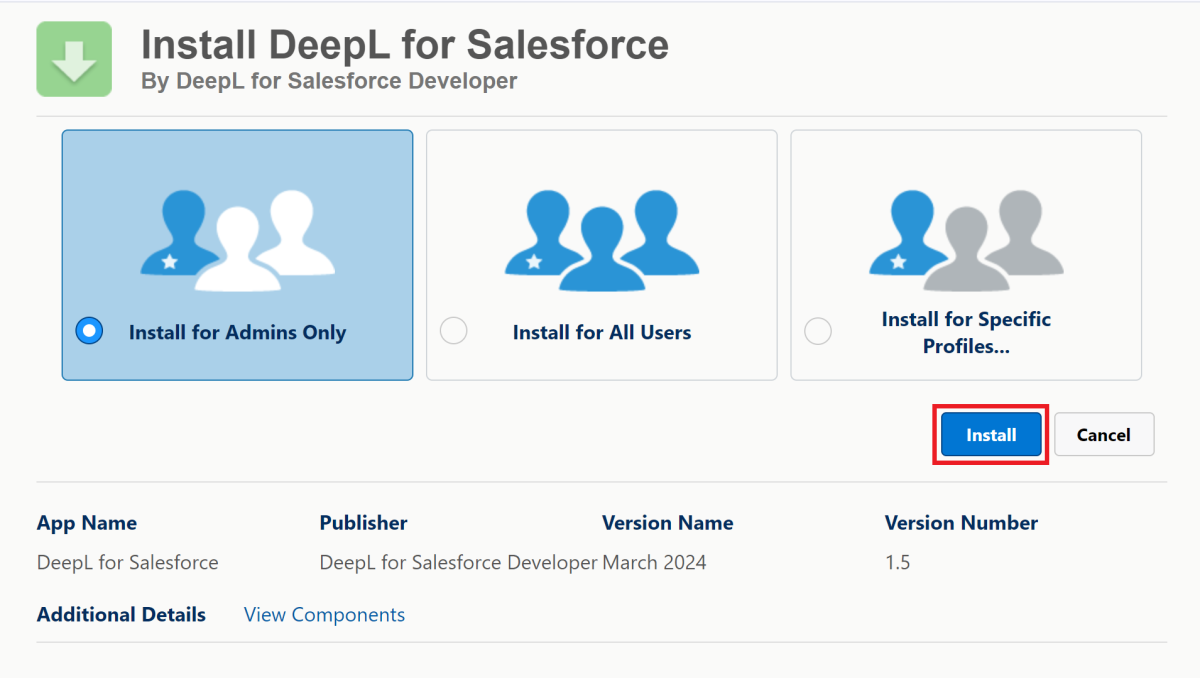
When you are on the installation page, select "Administrators only". This selection is necessary as otherwise unauthorised users could also gain access to sensitive data.
 X
X
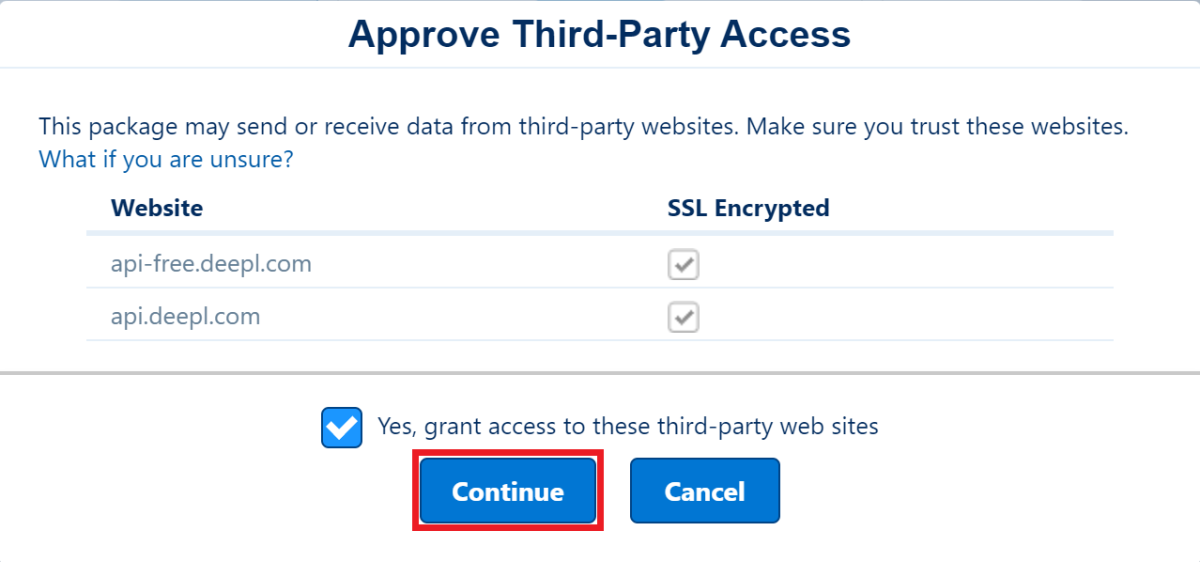
Click on "Install" and confirm the message "Yes, allow access to these third-party websites".
Background: As part of the installation, authorisation must be granted to access the DeepL interface. In addition to the interface, communication with the DeepL for Salesforce servers must also be established for the smooth operation of the tool.
 X
X
 X
X
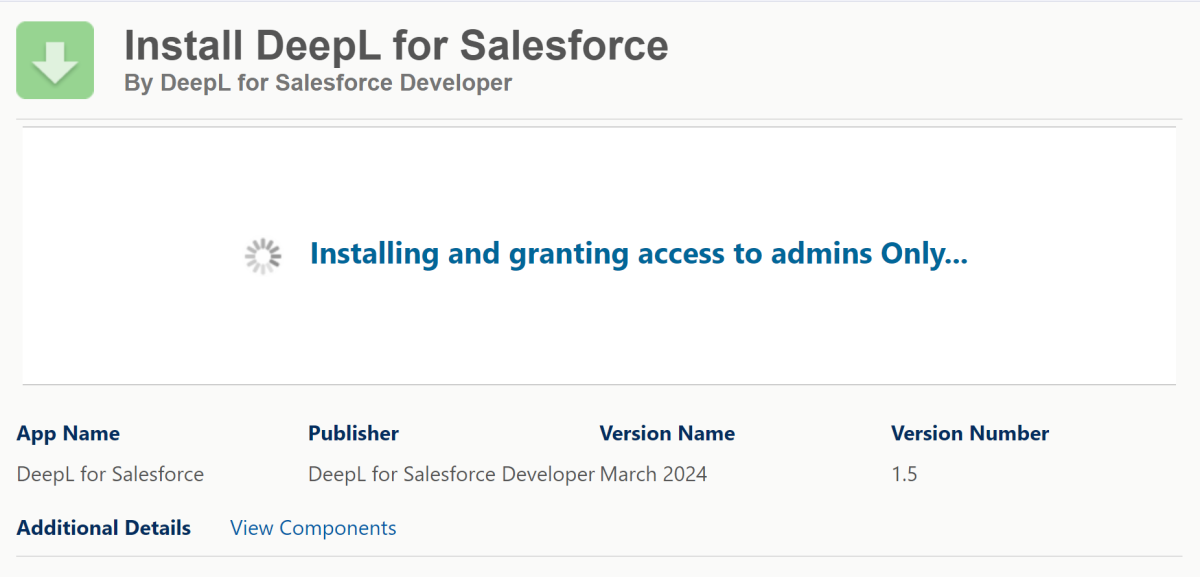
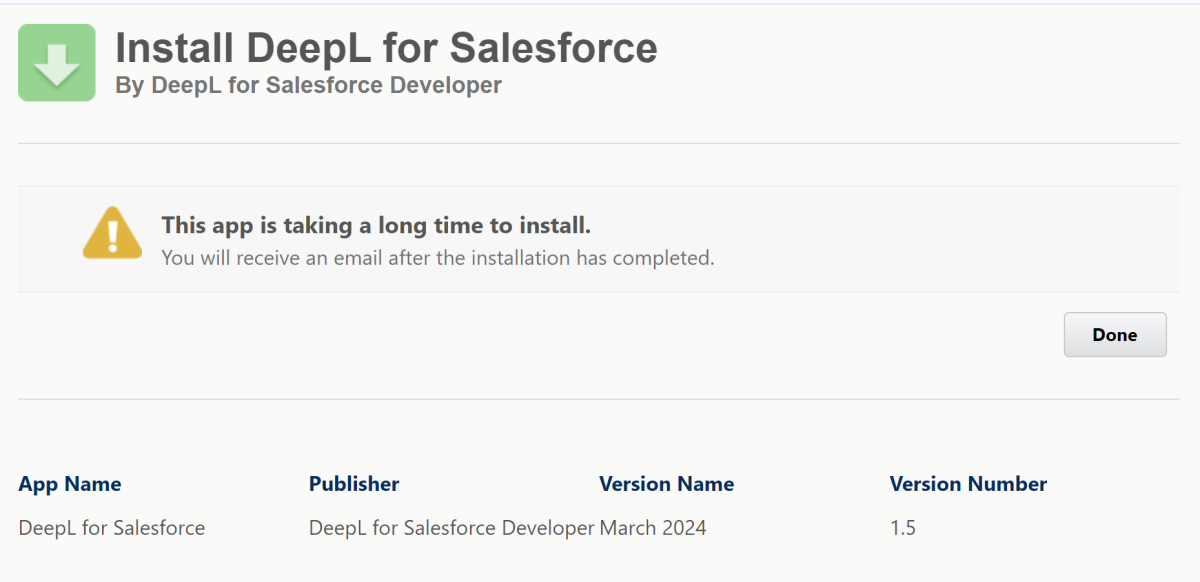
A notification may appear with the following content: "The installation of this application will take some time. You will receive an email when the installation is complete." If this is the first time you have received such a message, don't worry. Just click on "Done". Salesforce will then notify you by email when the installation has been successful.
 X
X
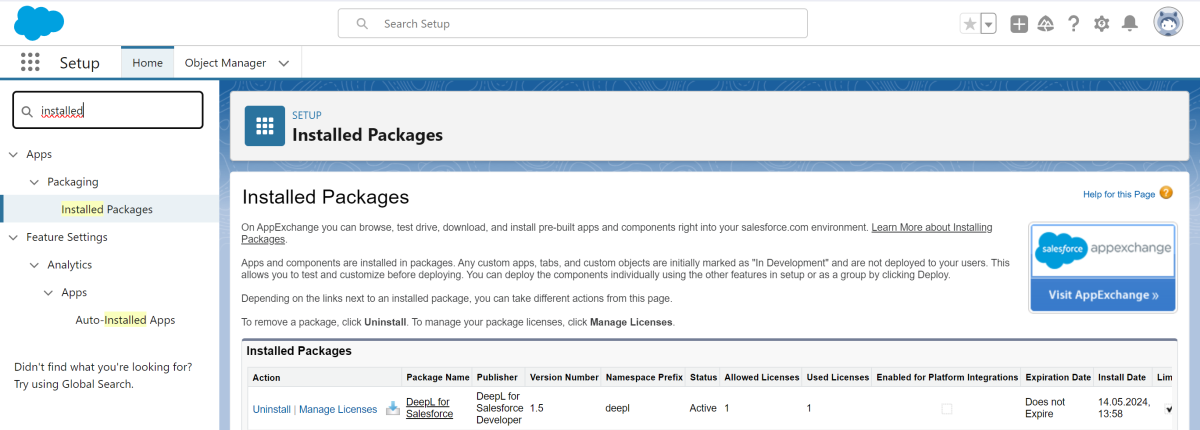
Once the installation is complete, we recommend checking the installation in the "Packages" section under "Installed packages" in the Salesforce setup.
 X
X
2.2. Granting rights of use
The use of the application requires the assignment of certain rights to the desired Salesforce user. A basic distinction is made according to the type of use:
DeepL for Salesforce Licences
Salesforce Permission Sets*
Administrative users require a valid DeepL for Salesforce licence for configuration. No licences need to be assigned for actual use.
However, Salesforce Permission Sets are assigned separately. A distinction is made between the following types of Salesforce authorisation sets in DeepL for Salesforce:
DeepL for Salesforce Admin: for full administrative access to all areas of the application.
DeepL for Salesforce Manager: for the administration of settings, templates and glossaries.
DeepL for Salesforce User: for user access.
Important: To use DeepL for Salesforce, a user must be assigned an appropriate permission set. Users without this permission cannot perform any functions and may cause severe errors.
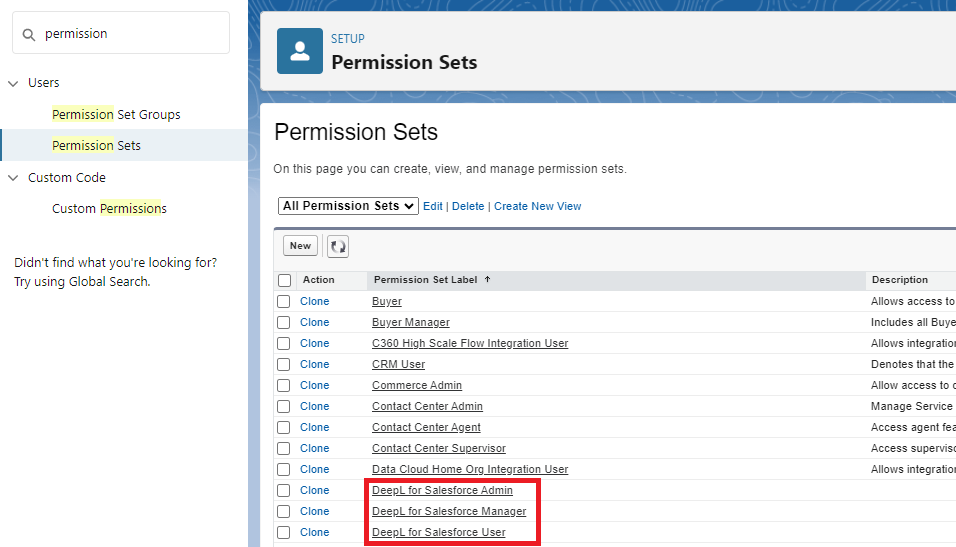
To assign these authorisation sets, search for "Permission Sets" in the setup.
In the list, search for "DeepL for Salesforce Admin", "DeepL for Salesforce Manager" and "DeepL for Salesforce User" and click on the respective set of rights that you would like to assign to a user.
 X
X
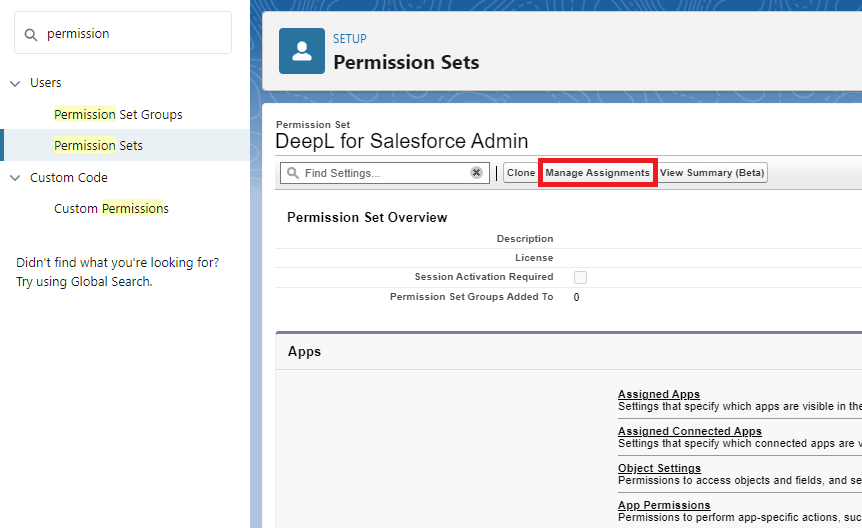
Go to "Manage assignments" and add the desired users by ticking the checkbox.
 X
X
IMPORTANT: It is also essential to grant access to the dashboards and reports supplied as standard with DeepL for Salesforce. To do this, please switch to the standard tabs for "Reports" and "Dashboards" in the Salesforce interface and (!) share the folder "DeepL for Salesforce", which was added during the installation of DeepL for Salesforce, with the group of all internal users. This sharing option can be found as follows: Search via the search function Reports or Dashboards > All folders > DeepL for Salesforce > Share (via the arrow function on the right). If this step is omitted, the home screen of the DeepL for Salesforce app cannot be displayed correctly for users without an administrator licence.
2.3. Configuration
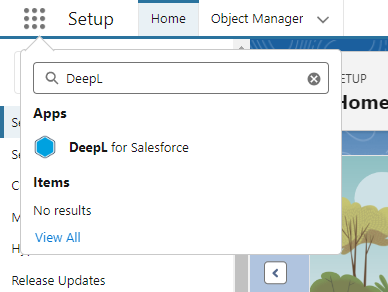
Search in the App Launcher* or use the search function to find the "DeepL for Salesforce" application.
 X
X
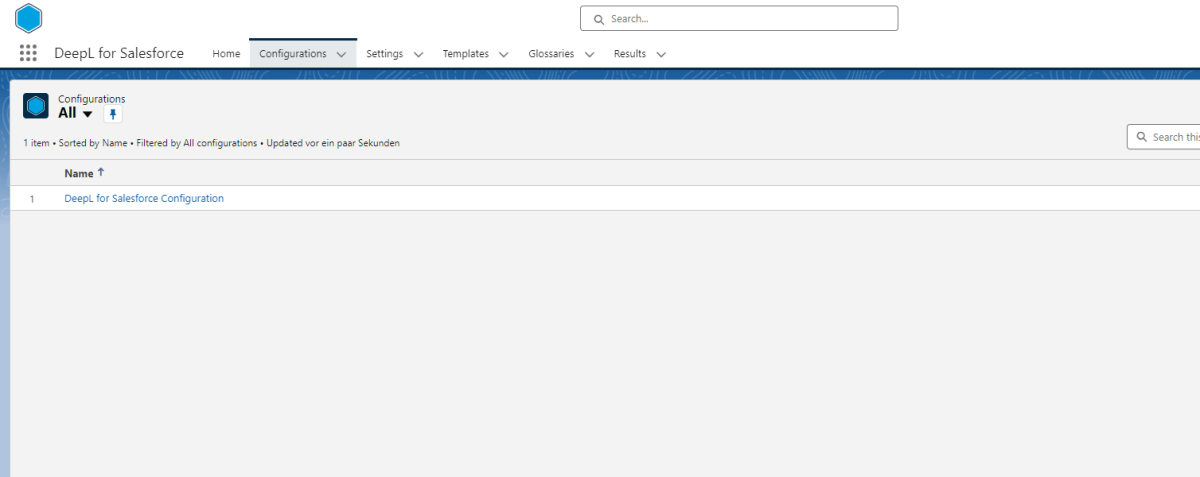
Switch directly to the "Configurations" tab in the app. You will already find a configuration data record here. In this record, you need to fill in the fields with the information required to configure DeepL for Salesforce.
 X
X
The following fields can be configured:
| Field | Mandatory | Description |
|---|---|---|
| Credential | Mandatory field | Shows whether DeepL for Salesforce is linked to your DeepL account. |
| Deactivated | Optional | Should not be ticked by default. This setting can be used to completely deactivate DeepL for Salesforce. |
| Error Email Address | Optional | In this field you can enter an e-mail address to which notifications will be sent in the event of an error. |
| Debug Mode | Optional | This setting is used for the extended display of communication details between Salesforce and the DeepL for Salesforce interface. |
A few more notes on the buttons in the configuration data set:
At configuration record level, you will also find the "Configure Credentials", "Refresh Glossaries" and "Manage Licences" buttons.
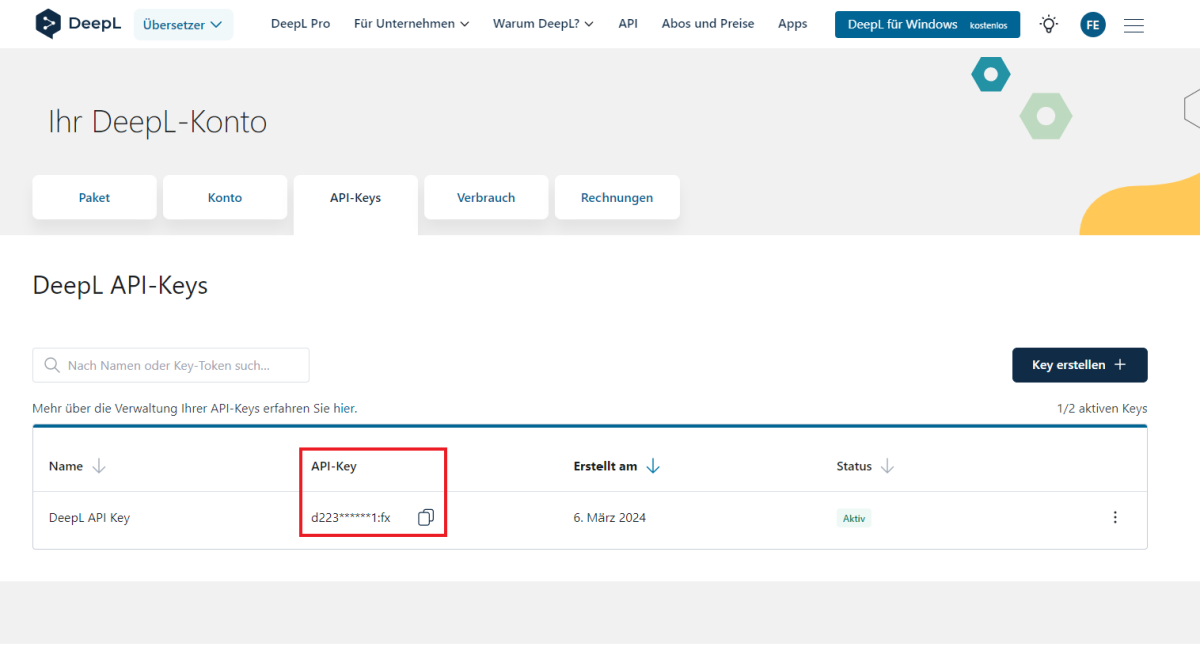
Use the "Configure Credentials" button to link your DeepL account with DeepL for Salesforce. To do this, you need an DeepL account and the (Authentication Key) for the account. You can find this within your DeepL account, or by using the following link: DeepL Authentication Key. Alternatively, if you don't currently have a DeepL subscription, you can use this link to sign up for a plan.
 X
X
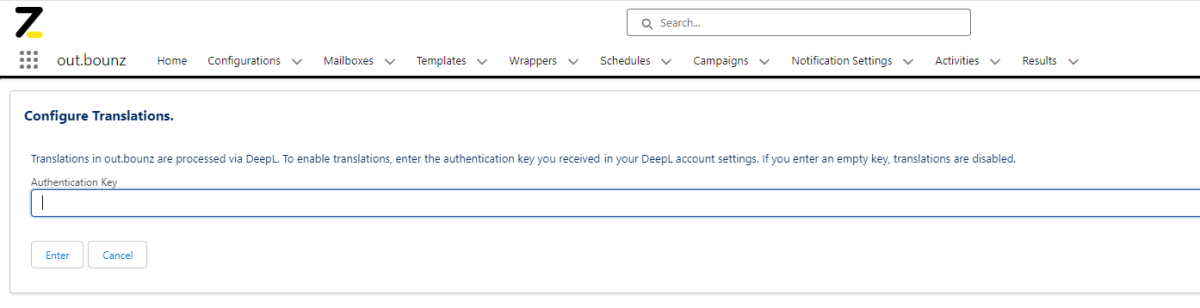
If you now click on the "Configure Credentials" button in the "Configurations" data record, you can enter the authentication key here.
 X
X
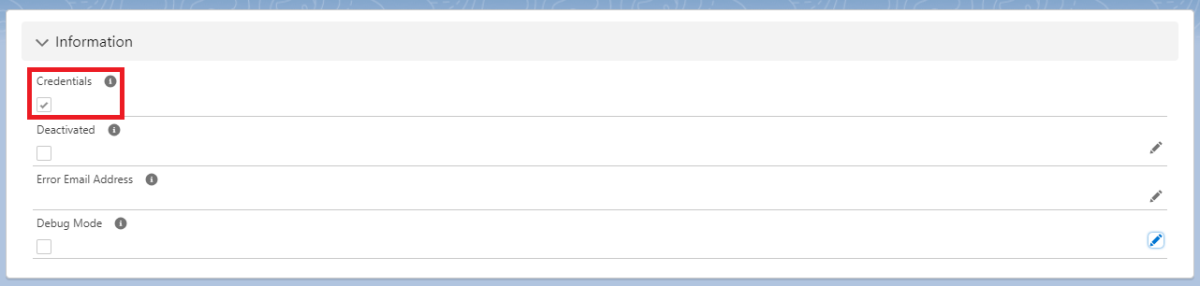
The tick under "Credentials" is then also set in the configuration data record.
 X
X
You can use the "Refresh Glossaries" button to delete existing glossaries from Salesforce and re-import them from your DeepL account.
You can use "Manage Licenses" to manage your DeepL for Salesforce licences (see the "Order licences" section).
2.4. Order licences
Once you have set up the configuration data set, you can now manage your licences if you want to use an extended version of DeepL for Salesforce or book additional licences.
Note: The free version of DeepL for Salesforce includes one licence and 100 translations per month.
The licence fees for the use of the extended version of DeepL for Salesforce are collected by direct debit from the account you specify. This allows you to store your relevant information:
In the DeepL for Salesforce app, you will find the "Manage Licences" button at configuration record level. If you click on the button, a login page to your licence management area will open. In this customer portal, you will find all the important data about your DeepL for Salesforce licences, payment information and the option to book additional licences with a click.
To log in, you will receive a personalised code by email, which you enter in the login screen. After logging in, the overview page will open with some instructions on what information you need to provide us with so that you can use the extended version of DeepL for Salesforce in the future.
By clicking on "Check your billing address", you can enter a valid billing address. Then click on "Check your SEPA direct debit mandate" to issue a valid SEPA direct debit mandate. You will also find the input masks for your data below in the "Billing" and "Payment" tabs.
After you have entered and saved the necessary data, you will receive a confirmation email from us and a document with all the information about your SEPA direct debit mandate.
Please note: The email with the confirmation will be sent to the email address that was entered in the Salesforce AppExchange during the DeepL for Salesforce download! If this email is not available, simply send us a message to support@deepl-for-salesforce.com.
 X
X
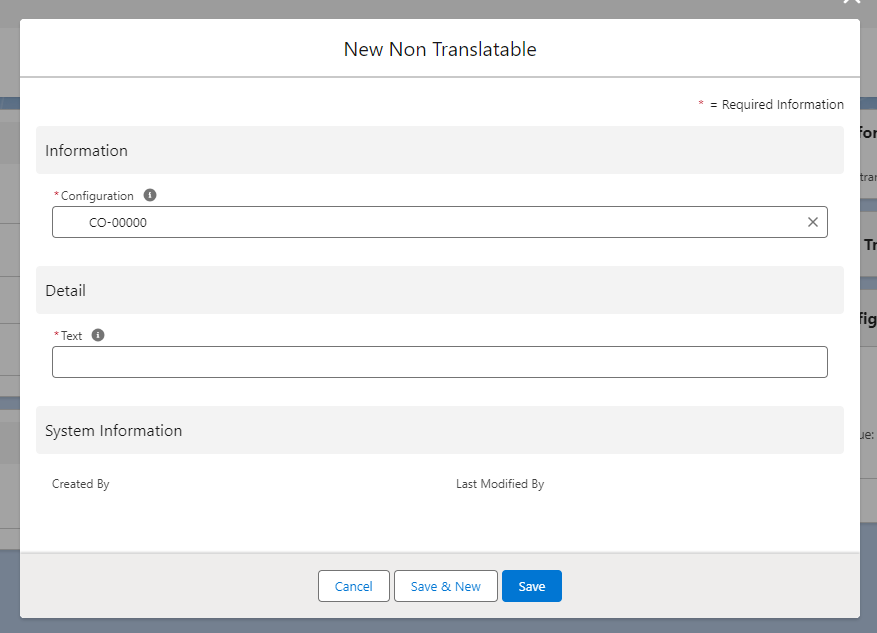
2.5. Adding Non-Translatables
Non-translatables are terms that should not be translated under any circumstances, such as brand names, proper names, etc.. You can see these on the right-hand side of the "Configuration" data record under "Non Translatables". To add a new term, click on "New" next to "Non Translatables".
 X
X
Under "Text" you can now enter the text that is not to be translated.
3. Operational Use of DeepL for Salesforce
In this chapter, we describe how you can get the most out of DeepL for Salesforce. This also requires minor configuration measures, which - like the configurations already completed - only need to be carried out once.
We will show you the settings using use cases to make the configuration clearer. Of course, you can configure and use DeepL for Salesforce for your own individual use case and with your own custom objects.
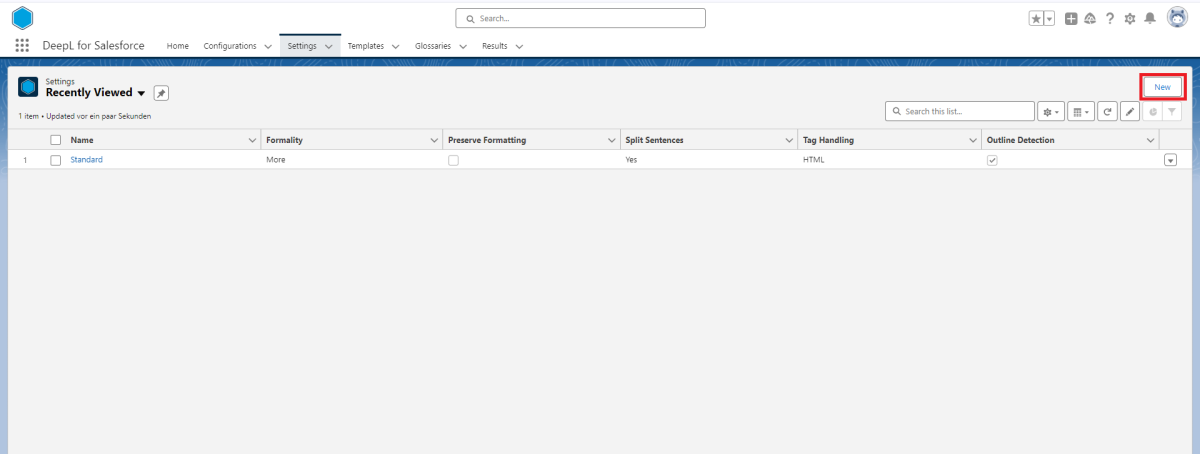
3.1. Settings
With Settings, you can define the basic translation settings that DeepL should use to translate your texts later. You can create a setting by clicking on the "New" button at the top right of the "Settings" tab.
 X
X
An interface for creating a "template" data record opens. Fill in the following fields for the configuration:
| Field | Mandatory | Description |
|---|---|---|
| Name | Mandatory Field | Own, freely selectable name for the setting. |
| Formality | Mandatory Field | Here you can select whether the translations of DeepL should be more ("more") or less ("less") formal. |
| Preserve Formatting | Optional | Here you can specify whether the translator should retain the original formatting, even if it would normally correct some aspects (e.g. capitalisation). |
| Split Sentences | Optional | Here you can specify whether the translator should first split the input into sentences. Possible values are: No - no splitting at all, the entire input is treated as one sentence, Yes - splitting for punctuation marks and line breaks, No New Lines - splitting only for punctuation marks, line breaks are ignored. |
| Tag Handling | Optional | Here you can select whether HTML or XML tags occurring in the text to be translated should be interpreted. |
3.2. Templates
Templates are translation templates in which you specify which field is to be translated into which field and in which language. You can create a template by clicking on the "New" button at the top right of the "Templates" tab.
 X
X
Templates have always one of two types: Record and Text
Templates of type Record can be used for standard, record-based operations. Here, data is extracted from your Salesforce Organisation, manipulated according to the defined operation and stored back in your Organisation. The scope of this operation is limited to one object, which means that data from one specific object can only be stored back in that exact object.
For more freedom in designing operations, choose type Text. Here you can also process data that is not stored in your Salesforce Organisation (for example, data from input fields). You also have the option of extracting data from one object, performing the desired operation, and storing the data in another object of your Organisation using Apex Callouts or Flows. The Text type can also be used for the dynamic translation of Lightning Record Pages.
When creating a template, fill in the following fields for the configuration:
| Field | Mandatory | Description |
|---|---|---|
| Name | Mandatory Field | Own, freely selectable name of the template. |
| Object Name | Mandatory Field | Name of the object to which the action refers. |
| Type | Mandatory | Choose whether the action you chose for your setting should be executed for records or using free text |
| Setting | Optional | Here you can select one of your settings |
| Source Language Field Name | Optional | Here you can define the field in which the text in the source language is to be stored. |
Now click Save and you will be taken directly to the newly created template. Here, under “Details” there are additional fields that can be configured. Depending on which operation (Write, Translate) is specified in the corresponding setting, you can configure different fields here.
For the DeepL Translation feature you will find the following fields:
| Field | Mandatory | Description |
|---|---|---|
| Setting | Mandatory | Reference to the setting, which you already chose during the template creation. |
| Source Language | Optional | Here you can define the source language for the translation. If you choose not to specify a source language, it will be detected by DeepL's automatic language detection feature. |
| Glossary | Optional | Here you can specify glossaries which should be considered for the translation. |
| Target Language | Mandatory | Here you must choose the target language for the translation. |
| Source Language Field Name | Optional | If you didn't define a source language (and therefore using DeepL's automatic language detection), you can specify a field where the detected language should be saved after the translation. This is extremely powerful if you don't know the source language in advance, but would like to save and further use the source language in the future. |
For the DeepL Write feature you will find the following fields:
| Field | Mandatory | Description |
|---|---|---|
| Setting | Mandatory | Reference to the setting, which you already chose during the template creation. |
| Target Language | Optional | Here you can define the language for which the write feature should be used. The target language must always be the same as the text that should be optimised. |
| Source Language Field Name | Optional | If you didn't define a target language (and therefore using DeepL's automatic language detection), you can specify a field where the detected language should be saved after the optimisation. |
Once you have completed the basic configuration of the template, you need to define which field is to be translated from and into which. To do this, click on the "Configure" button at the top right of the template.
 X
X
Here you define a target field, i.e. the field in which the translated text should later be stored. Now give the configuration a name and define the field in which the text to be translated is located in "Source Field". In "Context Field" you could now additionally specify a field that is in the context of the field to be translated. This ensures that some words are not translated in the wrong context.
3.3. Glossaries
A glossary can be used to define translations for certain words and phrases.
Glossaries can either be imported directly from your DeepL account using the "Refresh Glossaries" button, or created directly in DeepL for Salesforce. In DeepL, you can create a new glossary by clicking on the "New" button in the top right corner of the "Glossaries" tab.
 X
X
A dialogue box for creating a "Glossary" data set will open. Fill in the following fields for the configuration:
| Field | Mandatory | Beschreibung |
|---|---|---|
| Name | Mandatory Field | Own, freely selectable name of the glossary. |
| Source Language | Optional | Here you enter the language from which you want to translate. |
| Target Language | Optional | Here you enter the language into which you want to translate. |
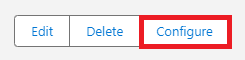
Once you have created a glossary record, you can now define which word should be translated into which by clicking on the "Configurations" button in the top right-hand corner of the glossary.
 X
X
3.4. Invocation of a template
To actually execute a translation or use the DeepL Write function, you now need to define where and when the action should happen. Templates need to be triggered to be executed exactly as you want to. There are two main options for this trigger:
- All templates can be triggered via Apex Code
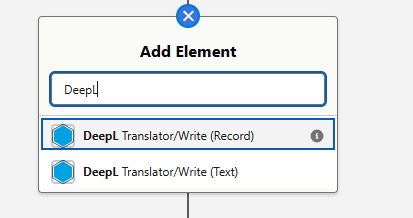
- All templates are Apex invocables and can be triggered by Salesforce Flows. The type of flow (record-triggered, autolaunched, screen flow) can be freely selected; all can be used for the translation or the Write function. Click on “Add Element” in a flow, search for "DeepL" and choose one of the document elements based on the specified type of the template.
 X
X
In the following example, we have modeled a screen flow for the use of free text translation with DeepL for Salesforce. Our flow is structured as follows:
- Screen Flow Start Element
- A Screen Element, where the user can input the text that should be translated
- A DeepL Translator/Write element, in which two variables are specified:
- Template ID of the template to be used for the translation
- Text from the User Input field of the first screen element
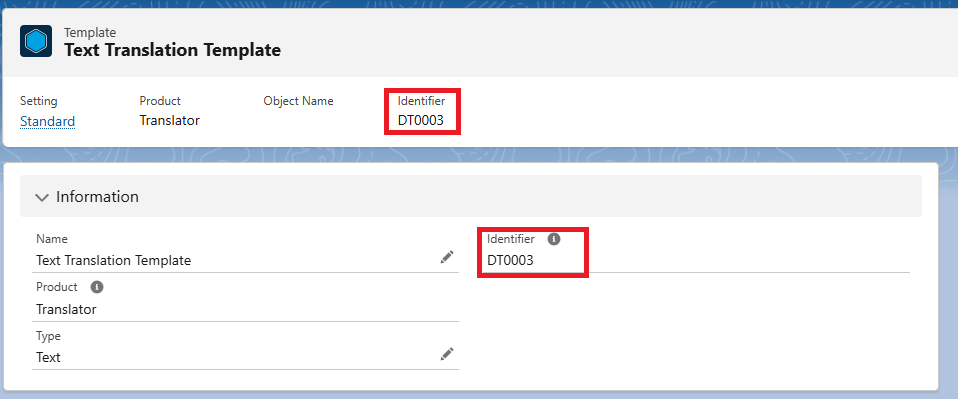
Here you can see the flow we have built. In the DeepL element, you must enter the Template ID as well as the text (for type "Free") or the ID of the record (for type "Record").
The template ID always follows this pattern: DT-{0000}. You can find it in the template record in both the top bar and the “Information” section. The template must, of course, be activated in order to be executed.
 X
X
Now, we must complete our flow, as the action has been triggered, but we haven't used the text that was produced by the DeepL template yet. To further use the results of the execution of the template of type "Free", you can now access three variables:
- "Result": Tells you if the action was successful or if any errors ocurred
- "Detected Source Language": Can be used to find out which source language was automatically detected by DeepL
- "Text": The actual modified text
These variables allow us to now use and perform actions with the output in our Salesforce Organisation.
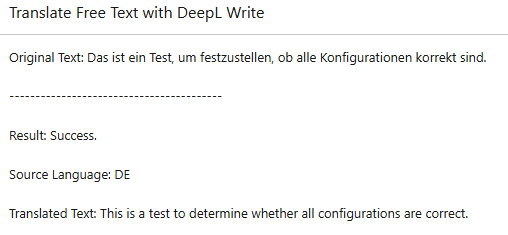
For our flow, we have created a second screen element displaying all three fields to the user:
As shown here, all three fields can be accessed in the flow via merge fields.
Now we activate our flow and test the feature to make sure we have configured everything correctly. Below you can see the display of the second screen:
 X
X
4. Error Handling
4.1. Data entry error
If an error occurs due to incorrect entries or connection problems, the user will receive a corresponding message.
If no error message is displayed, it can generally be assumed that the action triggered was successful.
Some of the error messages displayed come from third-party systems that are connected, the DeepL for Salesforce application or Salesforce itself.
If an error message is unclear, we recommend that you consult the Salesforce administrator responsible for the installation. If they are unable to help, simply send an email to support@deepl-for-salesforce.com and attach a screenshot of the error message so that we can help you directly.
4.2. Error with actions executed in the background
For a better overview, a large part of the actions carried out in the background are stored in a specially created object called "Result". This makes it possible to track actions carried out in the background or automatically.
A list of these result data sets can be found in the "Results" tab. If the operation is successful, the message "Success" is displayed. If an error occurs, the corresponding error is displayed.
Note on freeing up storage space: To free up storage space that has been used up over time by accumulated "Result" data sets, the "Clear" button can be used in any list view of the "Results" tab. Please note that when you use this button, all "Result" data sets are always deleted, regardless of the list view currently displayed!
4.3. Errors with consecutive transactions
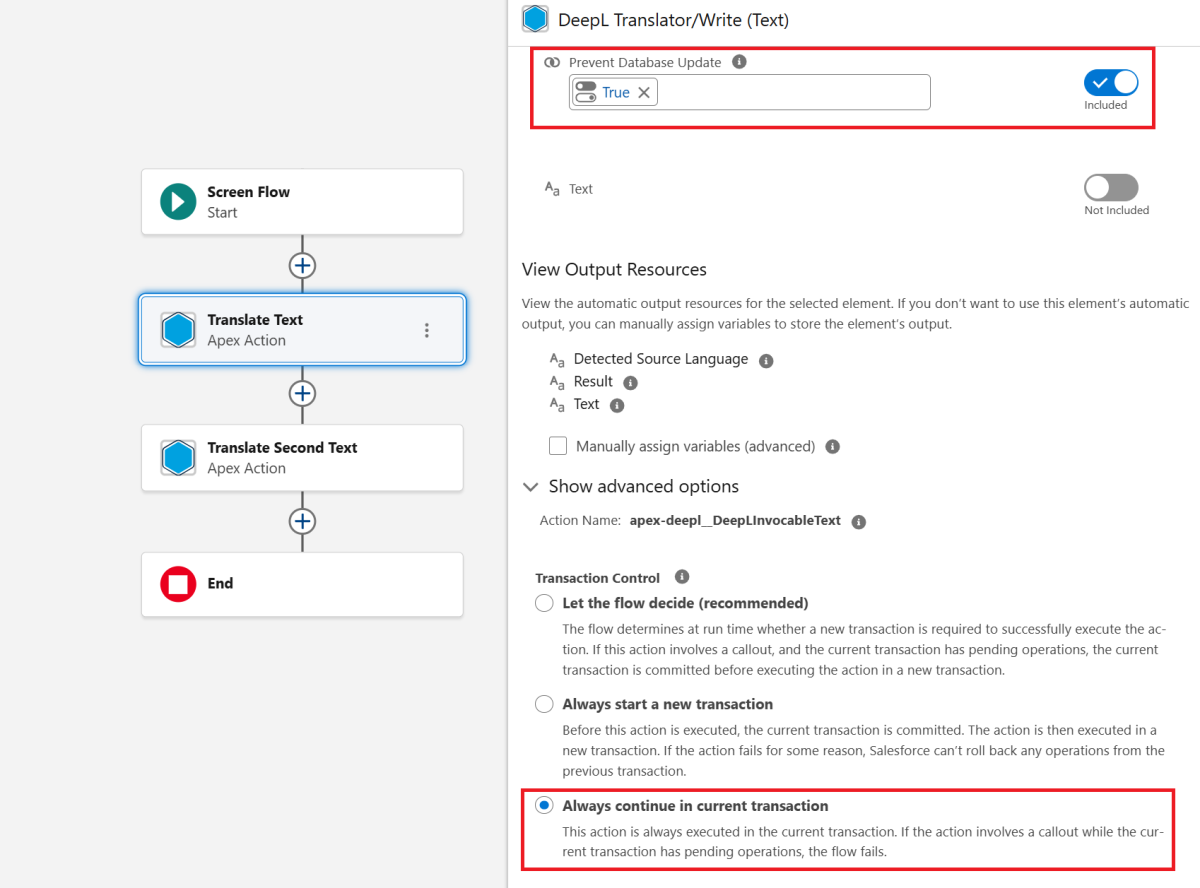
For transactions of type “Text”, errors may occur when saving data or performing database queries in the case of multiple consecutive transactions (in Apex/Salesforce Flows). To prevent these errors, there is a “Prevent Database Update” option, which temporarily stores database operations for the respective action but does not execute them yet. All collected database operations are then executed at once during subsequent “Text” actions.
To use this function, the following specifications must be made:
- Set the “Prevent Database Update” parameter to true.
- For flows: In the advanced options, set the transaction control to “Always continue in current transaction.” This prevents the flow from generating new transactions on its own.
 X
X
Note: We strongly recommend using this function only if errors occur in the context of several consecutive DeepL For Salesforce actions of type “Text”. Inaccurate or incorrect implementation of the function can result in lost data from actions as well as actions not being executed correctly.
5. Glossary
Objects
Data record types within the Salesforce database. Examples of standard objects that are already created in Salesforce are accounts, contacts and opportunities. In addition to the standard objects that exist in Salesforce, any number of custom objects can be configured in Salesforce.
App Launcher
The App Launcher in the Salesforce org allows users to switch between different applications. The App Launcher displays tiles that are linked to the available Salesforce applications, the connected applications (third-party apps) and the user's local applications.
Permission sets
A collection of authorisations to extend the access rights granted to users at profile level.
Toolbox
The toolbox can be used to display and add resources in the Flow Builder.